We will now turn to WinZip 6.0. This program zips files into one big file. The way this happens, is that the program compresses multiple files or just one file into a zipped file, which is usually smaller in size than the original files and more compact and organized. To access the zipped files and use them, these files need to be unzipped or extracted using the WinZip program. An example of a use of WinZip is:
You typed up say twelve reports using Microsoft Word and the total size of your 12 reports is more than 2 megabytes. Say you now want to transfer your reports onto a disk and want to bring your disk to your friends computer and open them up on your friends computer using his version of Microsoft Word. However, a 3.5" floppy disk can only hold as much as 1.44MB so your reports are too large. You can then either use multiple disks to copy the reports onto or you can zip your files. Once zipped using WinZip, the 12 files will be under one file name which will end with a .zip type. The size of this one file which will contain within the 12 zipped reports will most likely me somewhere near 1MB. Therefore, you can copy this one zipped file onto your disk and bring it to your friends house. However, your friend must also have WinZip or any other unzipping program (since almost all zipping programs are compatible) and on his computer you would unzip the zipped file and extract the 12 original files, which will now be 2MB big and 12 files long.
Locate the WinZip icon from your Start-Programs menu:
Click on it and you'll get the following opening screen if you
haven't registered your program yet. Click on "Agree"
to use the program.

Go to the File menu and you'll see the following menu. Click on "Open Archive" to open a zipped file.
When you are opening a zipped file, you are opening those files
whose icons look as follows:
You will now get the following type of screen when you click on "Open Archive". Go to the directory where your zipped file is located. In this example on my computer, it is the directory called Pages and there are several zipped files under this directory.

I have double-clicked on one file called "Lessons.zip" and I got the following screen, which is a listing of the files compacted into that one zipped file. To the right of the file names are the dates and time the file was zipped. The original size of the file, the % that the file was compressed, and the packed/compressed size of the files. At the bottom right of the screen is the listing of the amount of files in the zipped file "Lessons.zip"- that is 5 files and the original size of the files- 8,892KB or a little less than 9 MB all compressed into about 5 KB.
Next, since I now want to extract these files from the zipped file "Lessons.zip" and use these files, I will choose extract from the menu. I will then get the following screen:
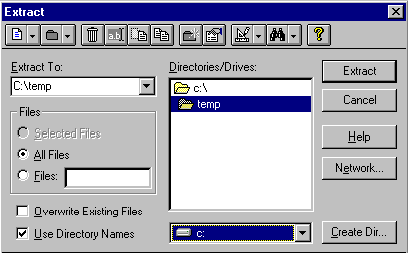
This screen asks me the directory to which I want the unzipped files to be placed. Here, I chose C:\temp.
After choosing extract, I get the following screen:

Now that the files have been extracted, I can use the files in a word processor or open them up in Microsoft Word. I can also go to the File menu again and I will be given more options. I can now delete the zipped file (archive) or copy, rename or move the archive. I can close or open or create a new archive also. Now, I will close the archive.
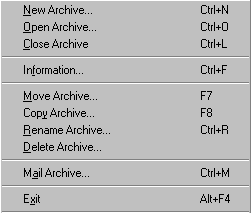
I will now go back to the File menu and choose "New Archive" and I will get the following screen:

From this screen I choose the name of a file that will hold the zipped files that I will place in it as well as the directory location of the file. After pressing enter, I am presented with the following screen which asks me to choose the files I want to add to the zipped file, which I name "lessons.zip".
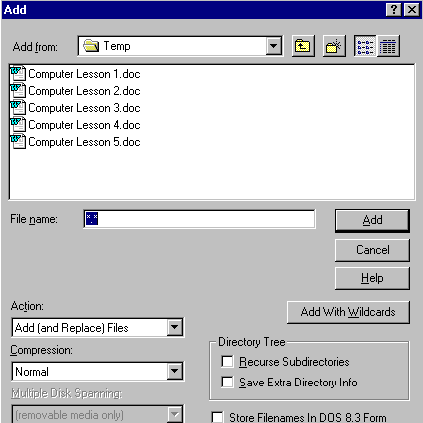
I then choose the files I want to add by highlighting the file and choose "Add".

When I do that, I get the following screen, which shows the contents of the file "lessons.zip". It currently has the one file that I added. To add additional files, I will choose "Add" from the menu.
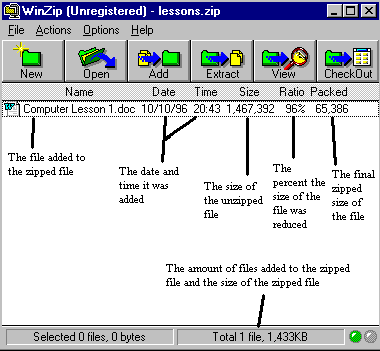
I will now choose the second file that I want to add to the zipped file "lessons.zip". Notice how the file "lessons.zip" appears in the listing of the directory, as this file has already been created and contains the file "Computer Lesson 1.doc" which I just added to it.

When I am done adding files to the zipped file, I will close the archive and choose exit from the menu.
Now, I will show you a second way to access the features of WinZip 6.0. Locate a zipped file on your computer. If you don't have one, then follow these graphics and directions.
I have located the file "Lessons.zip".

I will right-click on the file and will get the following menu:
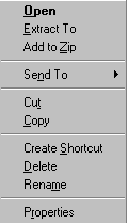
From this menu, I can choose open-

By doing this, I get the following screen- a listing of the contents of the zipped file. I can now extract or add additional files to this zipped file as well as utilize the other features located under the File menu.
I will now exit WinZip again from the file menu and will return and right click on the zipped file "Lessons.zip" again. I will now click on "Extract To"

After doing this, I automatically get the extract menu as shown beforehand.
I can also exit and return to the zipped file and right click on it again and choose "Add To Zip" and will get the Add menu as seen beforehand.
I will now exit WinZip 6.0 and return to the Windows desktop. We have just completed a quick tour of WinZip and "zip compression" under Windows 95.