We will now turn to a popular utility for Windows 95- Norton Anti-Virus. A virus is a program, which once activated by your computer can at worst delete all the information on your hard drive as well as some other system information and make your hardware useless. These viruses are written by computer hackers and virus programmers and others who wish to only cause havoc to others. These viruses can be transferred to your computer by using another person's floppy disk or even through the Internet. Viruses are often attached secretly to other files and programs, making them undetectable. Anti-Virus programs locate these viruses and delete them from your computer.
Norton Anti-Virus contains a list of known viruses and searches your computer for matching viruses and deletes them. Since this list of known viruses continually changes, Norton offers updates to the virus list online through their web page, using the "Live Update" option and your TCP/IP Internet account.
We will start off by learning how to initiate a virus search as well as having a virus search initiate itself at a scheduled time. Search and click on Norton Anti-Virus from the Start-Programs menu.
The program will then start and you'll get this screen:
We will first adjust the "Options". When you click on options you'll get this screen:

From here, you can choose what the virus scanner will scan as well as which types of files will be scanned.
Next, click on the word "Auto-Protect" to choose options from that menu.
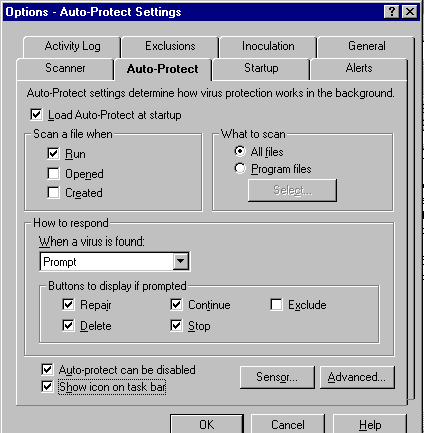
From this menu, you can choose to enable "Auto-Protect", a program which loads automatically when Windows 95 starts, which protects your computer from viruses by monitoring and checking all files ran and opened by the computer.
Next, Click on "Startup" to choose the options that you want Norton Anti-Virus to use when your computer start up.

From here, you can choose what will be scanned for viruses when
your computer starts.
When you are done, press "OK". Next, click on "Virus List".
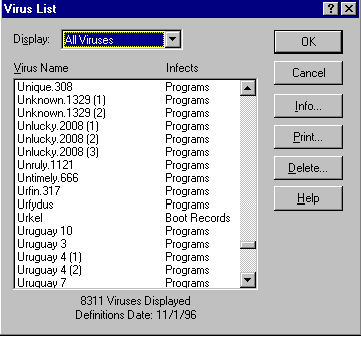
This screen gives a listing of currently known viruses which Norton Anti-Virus can scan for, locate and repair. Notice how there are over 8300 viruses, all which can be detected and repaired by Norton Anti-Virus. You can click on any virus name and click on "Info…" to get detailed information on this virus.
Click on "OK" to return to the main screen.
Click on "LiveUpdate".
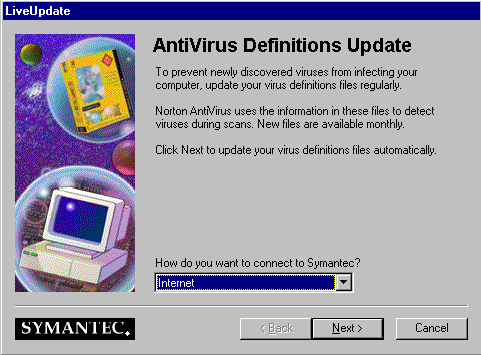
This feature enables Norton Anti-Virus to connect automatically to the internet through your modem and download (to retrieve from Norton's main computer) an updated virus list. You would normally click on "Next>" to continue through this process, but for now click on Cancel to return to the main screen.
Click on "Program Scheduler" to schedule Norton Anti-Virus to automatically scan all the files on your hard drive(s) at your specified time and day(s).
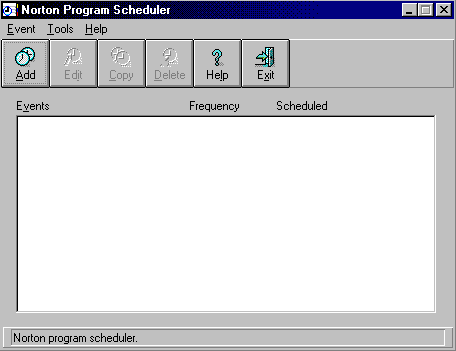
From this screen, click on "Add" to add a new scheduled program.
You'll then get this screen:
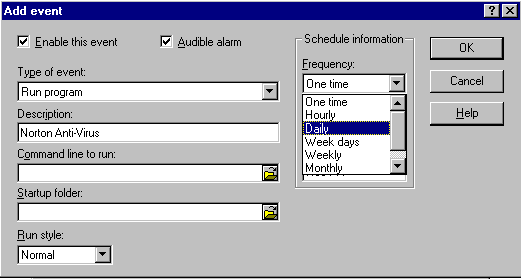
From here, choose the frequency which the program should run- I chose "Daily". Also, type in a description of the program- which is in this case "Norton Anti-Virus".

Next, enter in a time for the program to run. After than, Click on the small folder with an arrow to the right of the white box under the words "Command line to run:". You will then get a similar screen to the following:
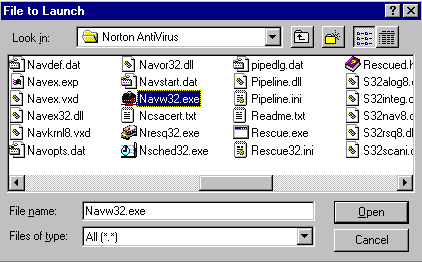
From this screen, you should chose the file which will be ran at the scheduled time. Here, the file should be "Navw32.exe" which is Norton Anti-Virus. Locate this file from your hard drive and double click on it.
After that, you will return to the following screen:

From here, fill in "Startup folder:" as described in the graphic (note: the drive and directory information present in the graphic might differ from what is applicable for your computer, depending on which drive and directory you installed Norton Anti-Virus to).
When you are done, click on "OK". You will get the following screen:

Click on "OK" to save this scheduled program.
After this, you will return to the main screen of "Program Scheduler" with the following addition:

Notice how the following icon has appeared on your menu bar at
the bottom right of the screen:
This is the Norton Program Scheduler icon, which if you double
click on it at any time will give you the above main Program Scheduler
screen.
Click on "Exit" to return to the main screen of Norton Anti-Virus. From here, click on the boxes to the left of the hard drive letters to choose which drives should be scanned for a virus. Make sure a check appears in the box. Then, click on "Scan Now" to start a scan for viruses on your selected hard drive(s) and/or floppy drive(s). During the scan, you will get the following screen, which has a status bar, with information on what has been scanned and what remains to be scanned.
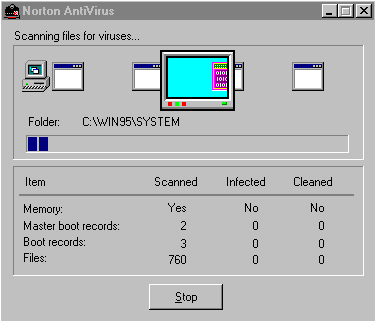
You can do other things with your computer while the program scans your computer, but your computer will perform much slower. You can also stop the scan abruptly in the middle of a virus check by clicking on "Stop" at any time during the scan.
When the scan completes or when you click on Stop, you will get a scan report detailing what was scanned and any results found. Click on Close when you are done reading the report.
Click on "Scan" from the menu and click on "Exit"
to exit Norton Anti-Virus.
You have just learned the basics of Virus Scanning and its importance. You are now well prepared to enter the realm of the internet, both prepared for downloading files and checking the files for viruses as well as prepared with the knowledge on how to connect to other computers and how to use your modem under Windows 95. In the next lesson, we will learn how to surf the internet using Netscape Navigator.